
Pet Carrier Cleaning and Inspection: A Safe Routine Before Travel
On this page
- Quick answer
- Identify the carrier type and instructions
- Empty and disassemble safely
- Inspect structure and hardware
- Clean removable soil
- Disinfect only when appropriate
- Rinse, dry, and air out
- Clean bedding and accessories
- Reassemble and test
- Confirm pet fit and ventilation
- Reintroduce the carrier positively
- Store it ready for use
- Pre-travel checklist
- Frequently asked questions
- Next steps
Quick answer
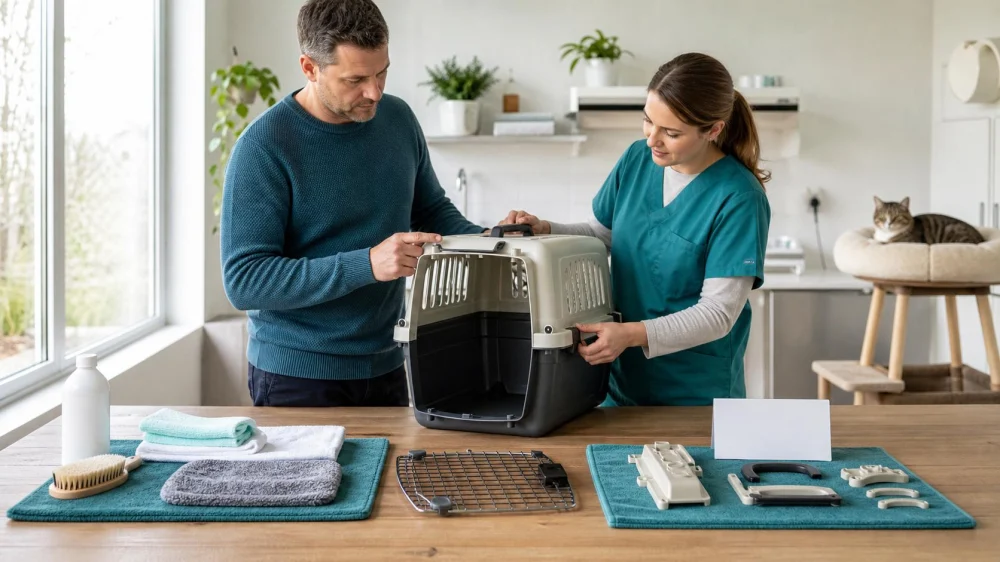
Before cleaning a pet carrier, read the manufacturer’s instructions and remove the pet, bedding, bowls, straps, and approved detachable parts. Inspect the shell or fabric, door, zippers, hinges, latches, handle, fasteners, seams, ventilation, and base for cracks, rust, fraying, chewing, warping, or missing pieces.
Remove visible soil with pet-safe methods, then use only a cleaner or disinfectant appropriate for the carrier material and the pet’s species. Never mix chemicals. Rinse as directed, dry every layer completely, air out odors, reassemble, and test all closures while the carrier is empty. Replace a carrier with structural damage or unreliable closure rather than relying on tape, string, or an improvised repair.

VIP Petcare Vaccination Clinic
ClarksvilleClark CountyIndiana
305 E Lewis and Clark Pkwy, Clarksville, IN 47129, USA
Identify the carrier type and instructions
Hard plastic kennels, wire crates, soft-sided carriers, backpacks, rolling carriers, and vehicle systems use different materials and hardware. Cleaning and load limits differ.
Find the manufacturer, model, size, weight rating, assembly guide, and care instructions. Airline, rail, veterinarian, evacuation shelter, and vehicle requirements can differ from ordinary home use.
Some fabric panels are machine washable; others contain stiffeners, foam, coatings, adhesives, or electronics that cannot be soaked. Plastic may be damaged by heat or certain chemicals.
When instructions are missing, contact the manufacturer or use conservative material-specific care. Do not assume that a product safe for floors is safe for a carrier.
Desert Tropical Aquatics
Apache JunctionPinal CountyArizona
715 S Del Rio Ct, Apache Junction, AZ 85120, USA
Empty and disassemble safely
Work in a ventilated area away from the pet, children, food preparation, and clean bedding. Wear gloves or eye protection when the product label recommends them.
Remove bedding, pads, bowls, toys, identification sleeves, absorbent liners, shoulder straps, wheels, and dividers. Photograph assembly before taking parts off.
Open every pocket and fold. Check for treats, medication, sharp objects, pests, vomit, urine, feces, broken plastic, and loose fasteners.
Do not force clips or bend a shell to disassemble it. If a fastener is stuck, use the manual or manufacturer support.
Inspect structure and hardware
Examine hard shells in bright light. Look for hairline cracks around screw holes, corners, vents, handles, and door frames. Flexing, whitening plastic, or sharp edges can signal stress.
Check metal doors and crates for bent wires, broken welds, rust, rough points, and gaps. Run a cloth near edges instead of a bare hand when sharpness is possible.
For soft carriers, inspect seams, mesh, zipper teeth, zipper pulls, hook-and-loop panels, clips, straps, and the internal frame. Small tears can enlarge during transport.
Operate every latch and zipper several times while empty. A door should close fully without unusual pressure, and locking parts should engage as designed.
Check the handle and attachment points, but do not lift a loaded carrier as a test. Use manufacturer-approved testing and stay within the rating.
Clean removable soil
Remove hair and dry debris with a soft brush, vacuum attachment, or damp cloth suitable for the material. Keep the vacuum away from the pet and empty debris safely.
Wash visible organic material with an appropriate detergent and water temperature specified by the manufacturer. Cleaning must come before disinfection because dirt can reduce disinfectant performance.
Pay attention to corners, door tracks, floor grooves, fabric seams, under removable bases, wheels, and handle recesses. Avoid flooding hollow parts that cannot dry.
Clean from less soiled areas toward more soiled areas and use separate cloths for waste. Dispose of contaminated materials according to product and local guidance.
Disinfect only when appropriate
Routine cleaning may be sufficient for ordinary dirt. Disinfection may be appropriate after illness, parasites, boarding, shelter use, or contamination, but the target organism and material determine the product.
Ask a veterinarian which disinfectant is appropriate when contagious disease is suspected. Cats, birds, reptiles, small mammals, and dogs can differ in chemical sensitivity.
Follow the label for dilution, surface precleaning, wet contact time, ventilation, rinsing, protective equipment, and disposal. A surface wiped dry too soon may not be disinfected.
Never mix bleach, ammonia, acids, alcohol, peroxide, or other cleaners. Dangerous gases, burns, and residues can result. “Natural” products and essential oils are not automatically safe for pets.
Rinse, dry, and air out
Rinse surfaces when the product label or carrier instructions require it. Pay special attention to floors, bowls, fabric, and areas the pet may lick.
Dry with clean towels, then air-dry completely in a ventilated place. Turn parts so water leaves seams, hollow tubes, wheel wells, and grooves.
Do not use high heat, an oven, open flame, or a hot closed vehicle. Heat can warp plastic, weaken adhesive, damage coatings, and create fire risk.
Smell the carrier after drying. Persistent chemical, mildew, or waste odor suggests residue or trapped moisture. Do not place the pet inside until the source is resolved.
Clean bedding and accessories
Wash bedding according to its care label and veterinary guidance. Use a fragrance level the pet tolerates and rinse thoroughly.
Inspect pads for torn covers, exposed foam, loose threads, wet filling, or chewing. Replace damaged items that could be swallowed or entangle the pet.
Clean bowls, water dispensers, and litter accessories separately using methods appropriate for food-contact items and the species.
Keep one clean backup liner and absorbent pad ready for an emergency trip. Avoid loose blankets that block ventilation or make the pet too hot.
Reassemble and test
Use the saved photo and manufacturer diagram. Install the correct fasteners in every required location and tighten only to the specified level.
Check that the top and bottom align, the door is oriented correctly, latches close, zippers reach their stops, and straps attach to reinforced points.
Shake the empty carrier gently and lift it only by the approved handles. Listen for loose parts. Place it on a level surface and check for rocking or collapse.
Do not substitute zip ties, tape, cord, wire, or random screws for structural hardware unless the manufacturer explicitly approves the repair.
Confirm pet fit and ventilation
The pet should be able to enter, stand in a natural posture, turn appropriately, and lie comfortably, subject to carrier and transport requirements.
Check total pet weight against the current rating. For young animals, remeasure before each trip because growth changes fit quickly.
Do not cover ventilation openings with bags, thick bedding, labels, or blankets. Maintain airflow around the carrier in the vehicle or waiting area.
A carrier that is too large can allow unsafe movement in some transport settings, while one that is too small restricts posture and ventilation. Ask the veterinarian or transport provider about the specific trip.
Reintroduce the carrier positively
Place the clean dry carrier in a familiar quiet area with the door secured open. Let the pet investigate voluntarily.
Use familiar bedding, treats, toys, or meals if appropriate for the species and veterinary plan. Keep sessions short and calm.
Practice closing the door briefly only after the pet is comfortable. Gradually add lifting, short carries, and vehicle exposure as appropriate.
Do not chase, force, or leave the carrier out only when something frightening happens. A carrier that is part of ordinary life can reduce travel stress.
Store it ready for use
Store the carrier clean, dry, assembled when space allows, and away from extreme heat, moisture, pests, chemicals, and heavy objects.
Do not stack items on a soft carrier or plastic shell. Compression can deform panels and damage ventilation.
Keep current identification in a protected sleeve without exposing unnecessary personal data. Store veterinary, medication, and evacuation information separately but nearby.
Set a calendar reminder for inspection and check again before every trip. Emergency readiness depends on the carrier being accessible, not buried in storage.
Pre-travel checklist
- Confirm model, rating, size, and transport requirements.
- Inspect shell, mesh, seams, door, zippers, latches, and handle.
- Remove soil before using any disinfectant.
- Use only material- and species-appropriate products.
- Never mix cleaning chemicals.
- Rinse as directed and dry every layer completely.
- Reassemble with all approved fasteners.
- Test closures while the carrier is empty.
- Confirm pet fit, weight, and unobstructed ventilation.
- Replace damaged equipment instead of improvising repairs.
Frequently asked questions
Can I use household disinfectant in a pet carrier?
Only if the product label, carrier material, and veterinary guidance support that use. Species sensitivity, dilution, contact time, rinsing, and ventilation matter.
Can I put a soft carrier in the washing machine?
Check the manufacturer’s care label. Frames, foam, coatings, electronics, and adhesives may make machine washing unsafe.
Is a cracked plastic carrier safe if I tape it?
No. Tape is not a reliable structural repair. Replace the carrier or obtain a manufacturer-approved repair before transport.
How often should I clean a carrier?
Clean after soiling and inspect before each use. The frequency of routine cleaning depends on use, species, illness, boarding, and manufacturer guidance.
Why does the carrier still smell after cleaning?
Residue or moisture may remain in foam, seams, hollow parts, or scratched surfaces. Reinspect and seek product or veterinary advice before reuse.
Next steps
Find the carrier manual, empty and inspect every part, clean visible soil, and use only approved products. Dry completely, reassemble, test empty, and confirm fit. Replace the carrier when structural or closure damage cannot be safely corrected.
This guide provides general maintenance information. Cleaning, disinfection, fit, and travel requirements depend on the carrier, pet species, health, and destination.


 Eastside Animal Hospital4.0 (480 reviews)
 Julie Bartz, DVM5.0 (3 reviews)
 Chateau Dog & Cat Hospital4.0 (314 reviews)
 Michael D. Wall DVM4.0 (54 reviews)
 Vetco Vaccination Clinic4.0 (12 reviews)
 Wilderness Trace Veterinary Clinic4.0 (81 reviews)
 Recognizing Pet Anxiety: Behavioral & Physiological Cues to Look For
 How to Plan a Pet-Friendly Party at Home – Fun Ideas for Your Pets
 How to Bathe a Dog That Hates Water: Tips, Tricks, and Step-by-Step Guide
 The Best Online Communities for Pet Health Advice (and Their Risks)
 How to Trim Your Dog’s Nails Without Stress: Safe, Calm Grooming Guide
 How IoT Devices Are Helping Pet Owners Stay Informed